
Basic F5 Big-IP LTM Setup With SSL
In this article I’ll demonstrate a basic load balancing configuration using HTTP and HTTPS on the F5 Big-IP LTM platform. As I don’t personally own a license for this product, I’ll be using the trial version of F5’s virtual appliance on my VMware cluster. You may find some differences between what you see here (Big-IP version 11.3) and what you’d see on a purchased license (Big-IP version 12.x).
Getting Started
I won’t show the initial configuration process of the F5 virtual appliance as this can be done numerous ways depending on your environment. I’ve placed my F5 VE behind a Sophos UTM firewall which is handling inbound TCP 80/443 NAT to my F5 VIP. My F5 is using a single internal network with self IP configured as 10.23.45.254 and main VIP for the virtual servers as 10.23.45.250. My two web servers (Debian with Apache for simplicity) are on this network as 10.23.45.10 and 10.23.45.20. Everything outside of the initial F5 networking config will be defined in my partition which I’ve named “omgwtfbbq.”
Creating Nodes
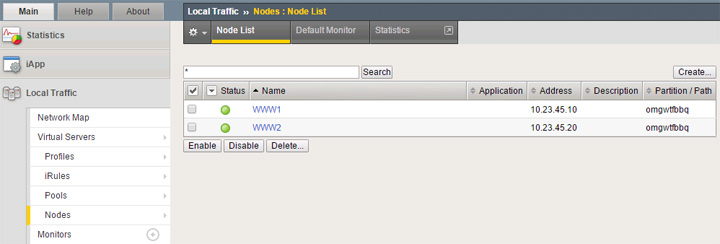
Seen above, I’ve created the two nodes for my back-end web servers with the previously mentioned IPs. I’m using just the node default health check which appears to be ICMP.
Creating Pools
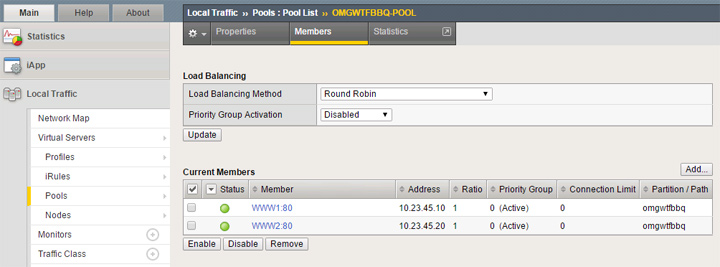
My first pool is for standard HTTP traffic and is named “OMGWTFBBQ-POOL.” I’m using a basic configuration with “http” health check. Creating the pool is simple as you simply select from your existing nodes and define the service port this pool will be using, so in this case it’s set to 80 HTTP.
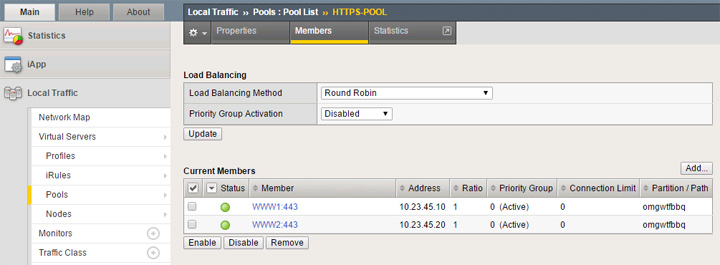
My second pool is for my HTTPS traffic and is named “HTTPS-POOL.” Creating this pool is done the same as the first one but selecting 443 HTTPS as the service port for each node.
Creating HTTP Virtual Server
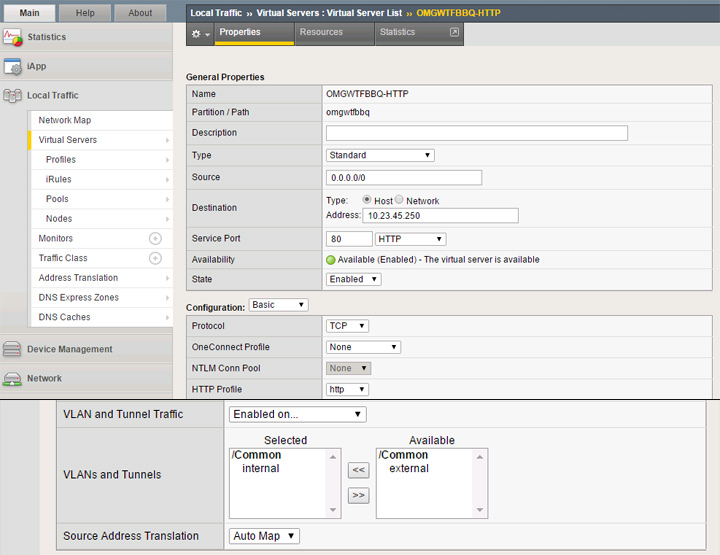
My first virtual server will be for standard HTTP traffic and is named “OMGWTFBBQ-HTTP.” I’m using only basic configuration options for this. Define the source as 0.0.0.0/0 (any) and the destination as an available IP which will be used as the VIP. As mentioned earlier, I reserved 10.23.45.250 for this purpose. Service port is set to 80 HTTP, protocol set to TCP, HTTP profile set to http and I’ve also specified the internal interface specifically for allowed traffic. If you’re only using a single interface you could simply leave it as the default which is to allow on all interfaces. In this setup, Source Address Translation must be set to Auto Map or your connectivity won’t work. Near the bottom you should see options for the default pool and persistence profile. Select your HTTP pool from the last section and set persistence method as required, or you can leave it as none.
Creating/Importing SSL Certificates
Before we create our HTTPS virtual server, I’ll show the process for bringing in an SSL certificate and creating a new SSL profile configured to use it.
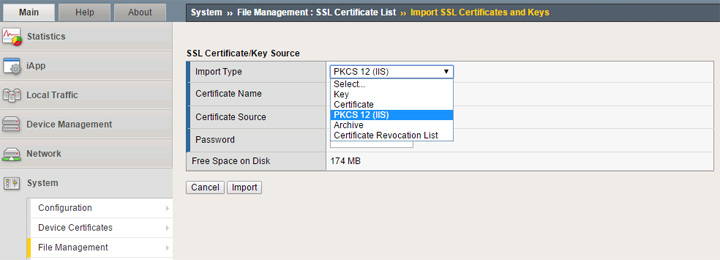
To work properly, you need to have both a certificate and key setup in your F5 partition. You can import these as separate items or as a package. The format you select will depend on how your certificate issuer has provided this to you.
If you need to generate a CSR, go back to the SSL Certificate List area and click the Create button. Give it whatever name you wish, set the issuer to Certificate Authority, enter the common name (FQDN) such as lb.omgwtfbbq.ca and the remaining fields for org name/address. After you’ve created the CSR it will present it to you in both plain text and as a downloadable file. In my example, I used this CSR to generate a free SSL certificate from Let’s Encrypt (specifically from https://gethttpsforfree.com to generate this manually). My certificate was presented in two parts so I used the Import button with type set to Certificate and just pasted everything as plain text.
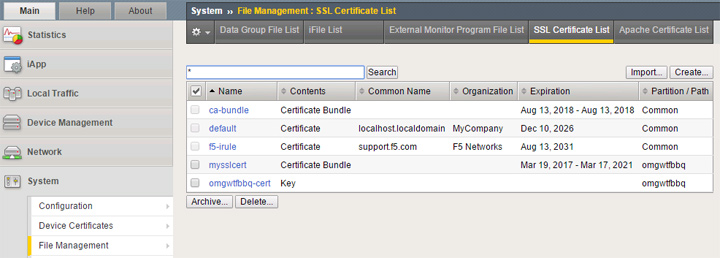
Seen above, “omgwtfbbq-cert” is the CSR I generated and “mysslcert” is the free certificate I imported as plain text.
Creating Your SSL Profile
In order to use the SSL certificate from the last section, you’ll need to create a custom SSL profile and specify your certificate and key.
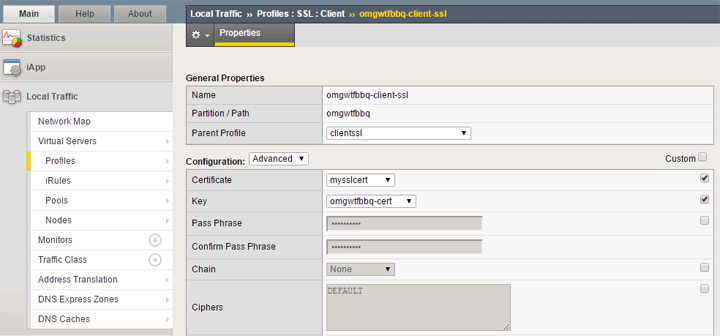
Create a new profile under the SSL -> Client area. Keep the parent profile set as the default clientssl profile. Enable the custom checkbox next to the certificate and key options, then set those accordingly as per the last section. In the picture above I’ve shown the advanced options as this includes the ability to manage your ciphers. The default cipher list may include weak ciphers and have SSLv3 enabled, which is something you can confirm by running your site through an SSL Labs test. To change from the default cipher list, use this F5 KB article https://support.f5.com/csp/#/article/K13163 for a list of supported ciphers. Here’s an example cipher list with SSLv3 disable which should get an “A” rating at SSL Labs:
ECDHE-RSA-AES256-CBC-SHA:AES256-SHA256:AES256-SHA:AES128-SHA256:AES128-SHA:ECDHE-RSA-AES128-SHA256:ECDHE-RSA-AES128-CBC-SHA:DES-CBC3-SHA:!SSLv3
Creating HTTPS Virtual Server
Now that we’ve got our SSL ready to go, we now need to create the HTTPS virtual server.
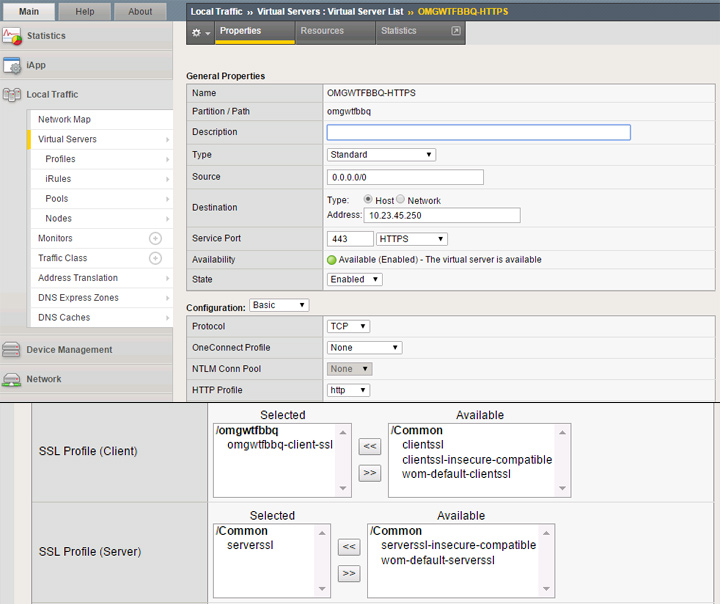
The source and destination settings will be the same as our first virtual server, but in this case we’ll need to set the service to 443 HTTPS. When you get to the SSL profiles, your client setting needs to be the SSL profile you created in the last section. For server profile, the default serverssl entry seems to be fine. As noted in the HTTP virtual server section, I’ve got the Source Address Translation set to Auto Map. For default pool, make sure to select your HTTPS pool you previously created.

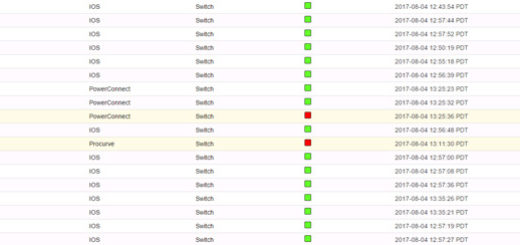
Assuming you didn’t screw anything up, you should have both virtual servers up with green status.
Conclusion
The F5 Big-IP LTM is a very nice product with great features but you’ll need to actually read the manual to understand many of them. I don’t personally use an F5 in production as my needs don’t require it, but this is something I would be happy to use at some point in the future.


1 Response
[…] Basic F5 Big-IP LTM Setup With SSL […]