
Installing Windows NT 4.0 On A PowerPC
The 1990s were truly an interesting time for computing. If you were a fan of Microsoft Windows NT, you didn’t even need an Intel x86 based computer to run it. The widely popular Windows NT 4.0 release carried initial support for Alpha, MIPS and PowerPC in addition to the Intel x86 platform. Though the MIPS and PowerPC support was later dropped leaving Alpha and Intel x86 as the only options by the release of Service Pack 6, you could enjoy Windows NT 4.0 on quite the variety of systems. The focus of this article will be the PowerPC release and what type of hardware it would run on, along with the specifics about my Motorola hardware. For any curious vintage Apple fans, I’ll state right now this does not work on any Macintosh systems.
Enter the PowerPC Reference Platform (PReP).
The apparent goal of PReP was to create a PowerPC standard among the companies manufacturing those systems allowing operating systems such as Windows NT, OS/2, Solaris and AIX to run. The standard was based on a PC clone type logic board with a PowerPC processor. This wasn’t the direction Apple seemingly wanted to go with for their PowerPC systems, and the major differences in how the system firmware operates is why the previously mentioned PowerPC operating systems cannot work on a PowerPC Macintosh. Eventually the PReP concept was dropped and the Common Hardware Reference Platform (CHRP) standard popped up in its place, though for the most part this also failed to gain traction. Aspects of PReP and CHRP can be found in later PowerPC systems, but that dream of full OS compatibility across vendors never came to light. Those with IBM PowerPC systems more than likely used AIX, and those with Apple PowerPC systems used MacOS (with the exception of the Apple Network Server which only ran AIX, but that system isn’t classified as a Macintosh).
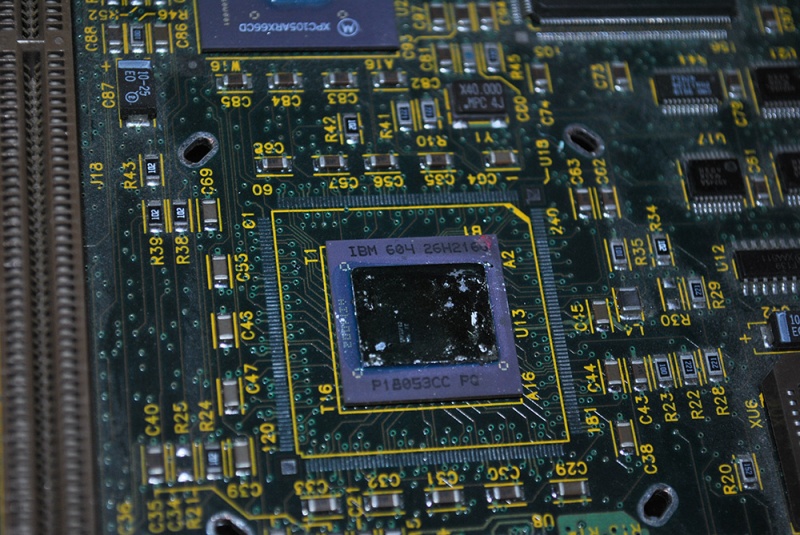
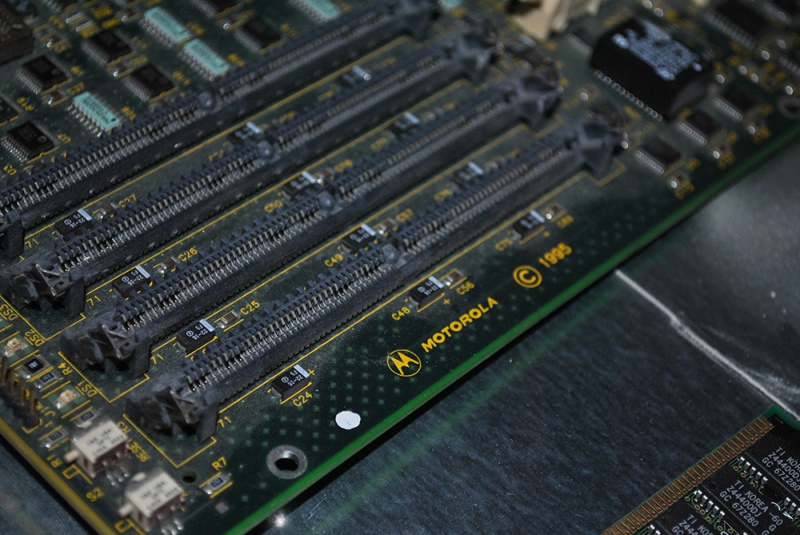
One of the companies developing computers under the PReP standard was Motorola. This is important as the hardware I used for this project includes the Motorola Atlas board with an IBM PowerPC 604 processor. It was extremely difficult digging up any information about this board as it seems different from the Motorola PowerStack, which was Motorola’s PowerPC based system released sometime in 1995. Everything I could find online relating to the PowerStack line makes it seem like the Atlas board is potentially an early version of what they eventually used in production.
The Atlas board follows the PC AT form factor and features on-board IDE and SCSI controllers. Since my working SCSI gear is reserved for my old Mac collection, I’m going with a standard IDE hard disk and CD-ROM. Compatibility seems good but it looks like there’s an 8GB limit in the firmware for visible hard disk space. For memory, it uses 72-pin SIMMs with or without parity. The memory I’m using is also FPM, though I’m not sure if this is a requirement. Much like the x86 boards of the time, the Atlas features both PCI and ISA expansion slots. One notable issue with the Atlas board is the use of the RTC style battery which is required to maintain firmware settings such as your bootloader configuration. After 20 years, this no longer works…

Dealing with the Motorola firmware.
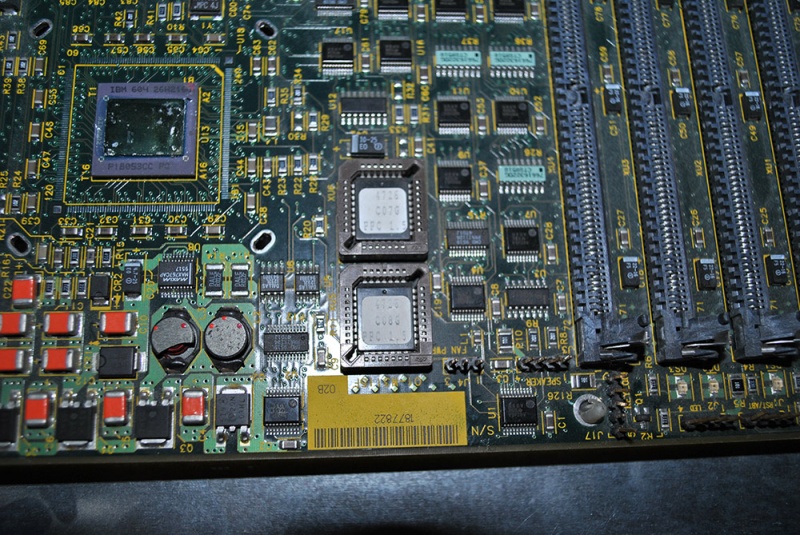
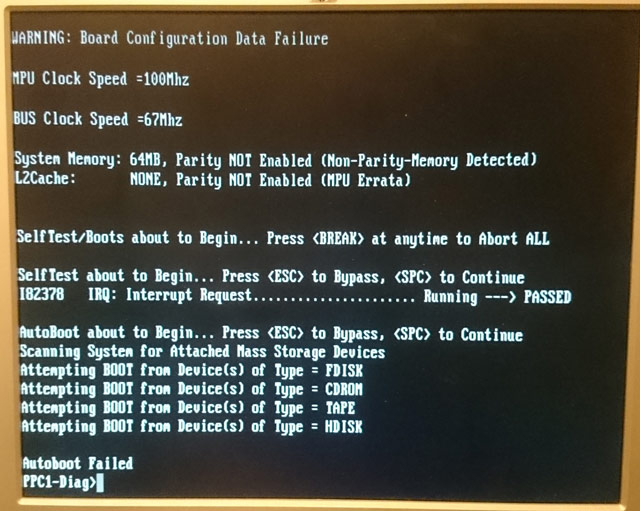
Trying to figure out how the board firmware functioned was probably the most unpleasant aspect of this project. When I first powered on this board, it would display the failure to boot notices and drop me into something called PPCBUG which seems to be what Motorola used on their PowerPC boards in the mid-90s. You can actually see the label on the firmware chips in one of the pictures above indicating version 1.5 of PPCBUG. See below for the actual screen output.
OK great, so now what? From the small bits of information I was able to find online, your system cannot use PPCBUG firmware to boot Windows NT. One important thing to note here is that PPCBUG is required to boot any OS that ISN’T Windows NT, such as AIX or Solaris. I tested this by finding a PowerPC boot disk for Solaris 2.5.1 (the only PowerPC release) designed for the Motorola system and watching it actually start booting. While I found that itself to be neat, I wasn’t going to settle for anything other than Windows NT.
After seeing reference to a new firmware image released by Motorola for NT booting, I was linked to an archive.org copy of a Motorola PowerPC support page from 1997 which included the NT firmware file along with a utility needed to write it to floppy. What they don’t tell you is the utility will only execute in Windows NT PowerPC, and trying to simply raw write the image with a modern application doesn’t work. Supposedly one option is to use PPCBUG to read the image file into memory and overwrite your existing firmware manually using hex location or some other wizardry, but this was nowhere within my ability. My accidental solution to this issue was randomly extracting an ARC boot file (arc151.exe) which was kicking around a few sites and being presented with the i386 version of the boot floppy utility. While I was happy to find this, it still required Windows NT to run so I had to install the x86 version of NT 4.0 on a spare PC just so I could make the bootable firmware update floppy. My hard work did eventually pay off and I was able to boot into the more modern looking firmware seen below.
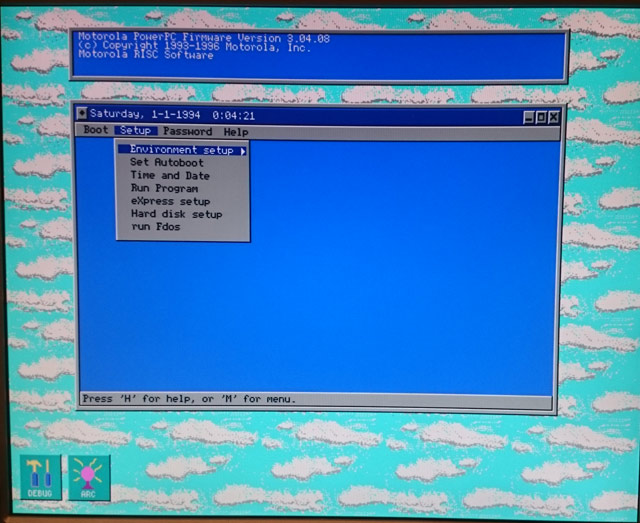
The firmware update process was fairly simple as you just needed to go into “Fdos” and run the flash command to overwrite the existing PPCBUG.
The final step before launching the NT installer is to do a bit of hard disk partitioning. This process caused me some grief as the way you THINK you do it is not even close to the proper way. The hard disk utility lets you create either a PowerPC boot partition or a FAT partition. If you picked PowerPC boot partition, you are wrong and the NT installer will fail to recognize any usable disk. The correct process is to create a single FAT partition. BUT WAIT THERE’S MORE! Your FAT partition only needs to be around 10 megabytes. I’m totally serious. You also have to tell the firmware to use that as the system volume or NT will yet again fail to do anything. The real fun part is once you load the NT installer, you actually create a second partition to hold your operating system. Your C drive is the 10 megabyte FAT partition with a couple system files in it, and your “winnt” directory will sit on your D drive (FAT or NTFS) with whatever size partition you specify. Once you’ve accepted this as the truth and your 10 megabyte FAT partition is ready to go, pop the NT 4.0 CD in your CD-ROM and run the menu option “eXpress setup” which kicks off the NT installer.
NOTE: If you run into any strange errors working with the hard disk partitioning in the firmware and your BIOS battery is dead, see further down in this article where I discuss dealing with dead battery related problems.
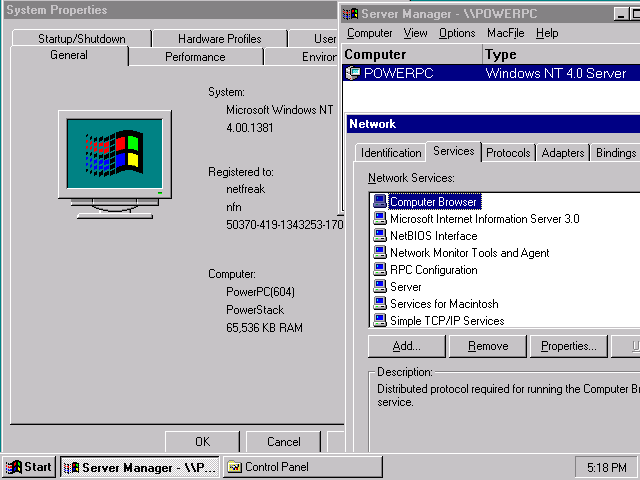
Assuming everything works properly with your NT installation, you should eventually boot into NT 4.0 PowerPC and see this reflected in the system properties seen below. I noticed NT saw my system as the PowerStack which probably isn’t accurate, but it may have simply made that assumption based on the firmware image. I’ll also note in my case the NT installer automatically updated the Motorola firmware with the proper bootloader settings and each system reboot took me back into NT without any issue.
The Windows NT PowerPC experience.
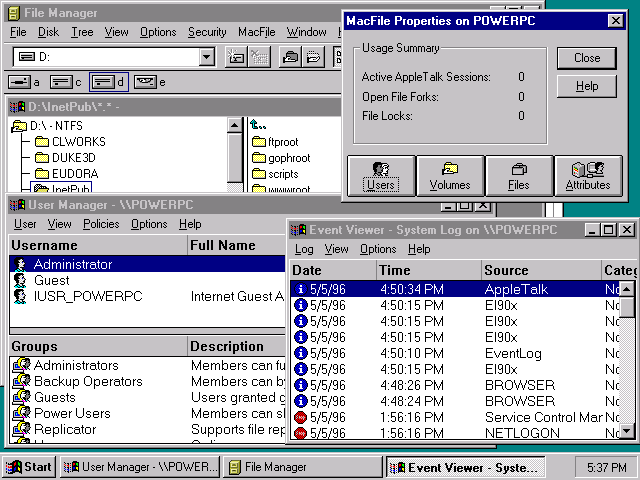
I chose the NT 4.0 Server edition as I wanted to play with some obscure network technology such as AppleTalk support. The default install will give you some standard network support such as TCP/IP but you may need to manually add these extra network options after your installation. As Windows NT is generally used for server purposes, and the PowerPC edition in particular has almost no available applications, I figured I’d mess around with IIS. I’ve previously used IIS on Windows Server 2003 systems, but was surprised to see that IIS for NT 4.0 actually features an integrated Gopher server.
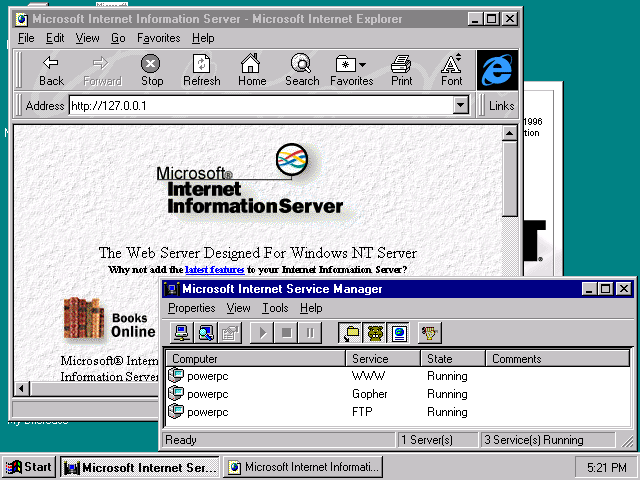
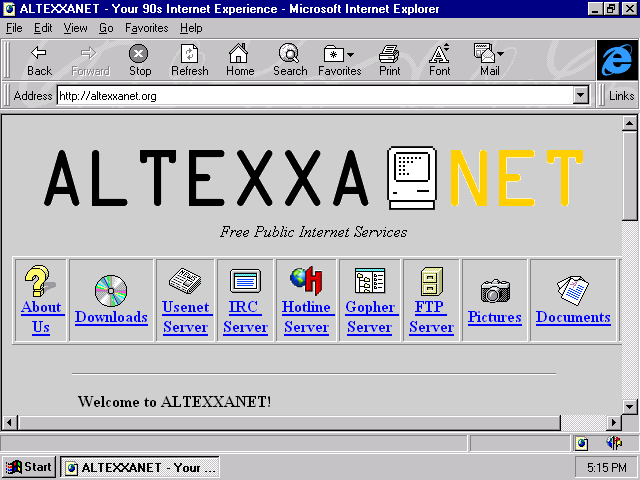
The Internet Explorer browser seen in the above and below screenshots is version 3.0 whereas the original install actually included version 2.x (back when the Windows logo took up the top right animation instead of the blue “E”). Seen below, you can still technically browse websites but you’ll more than likely encounter cipher issues with secure sites or poor rendering on others. I keep a basic HTML site up just for this sort of testing purpose.
As mentioned earlier, one thing I wanted to accomplish with this project was to try out AppleTalk support for NT. After you add AppleTalk protocol support to the network, you end up with this “MacFile” area in the control panel which lets you work with shared volumes for Macintosh clients. I fired up a Mac PowerBook 3400 and enabled AppleTalk over Ethernet and successfully mounted the default file share.
As Windows NT is geared toward multi-user functionality both locally and over network, it does feature built-in messaging support with Windows Messaging. This appears to allow for e-mail between NT user accounts either locally or possibly if you were running across a Windows domain, but in NT 4.0 I believe they did also add support for using Internet based mail with SMTP and POP3. Wikipedia claims this was originally named Exchange but renamed prior to the release of the Microsoft Exchange Server we’re familiar with today. This type of mail delivery system may also be related to Microsoft Mail product which seemed to be around for DOS and early Windows. A quick look at the WinWorld archives indicates that Microsoft Exchange Server 4.0 offers PowerPC support, so that might be an option if you wanted a full e-mail solution for your installation.

What else can you do with Windows NT PowerPC? Not much, really. The number of software titles which will run in 32-bit PowerPC native is less than 5 from what I’m seeing online. There was apparently rumor of a Microsoft Office port to PowerPC but this may not have reached public release. Interestingly enough, one software package available for PowerPC is the Microsoft Visual C++ development system. You could go ahead and write your own PowerPC Windows applications if you really wanted. In the screenshot below you’ll see an example of working on C++ projects on the PowerPC though I’m not a developer so it’s unlikely I’ll do much with this.

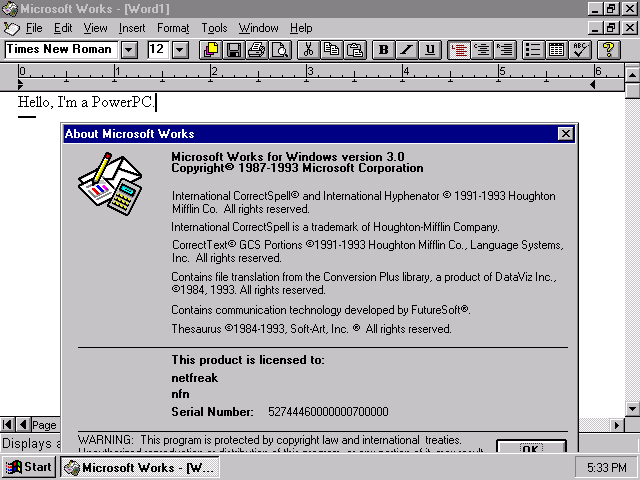
With so few options for actual PowerPC applications, you’ll be glad to hear 16-bit x86 applications will run in emulation. This works decently but doesn’t seem to be the most efficient for resource usage. I attempted to play Duke Nukem 3D and with the CPU pinned at 100% it performed like a 286. Attempting to run Microsoft Golf 2.0 (Windows 3.x version) resulted in an out of memory error, but NT itself did have plenty of available memory. I had better luck with applications such as WinZip, Netscape Navigator 3 and Microsoft Works.
At some point I may do further testing for 16-bit x86 applications, but you probably won’t find a whole lot of practical use for a Windows NT 4.0 system these days. I was amused to discover my Windows 10 workstation refused to connect to the NT 4.0 file share due to SMB 1 being “horribly and dangerously insecure,” so transferring files over was annoyingly done with FTP.
Dude, where’s my bootloader?
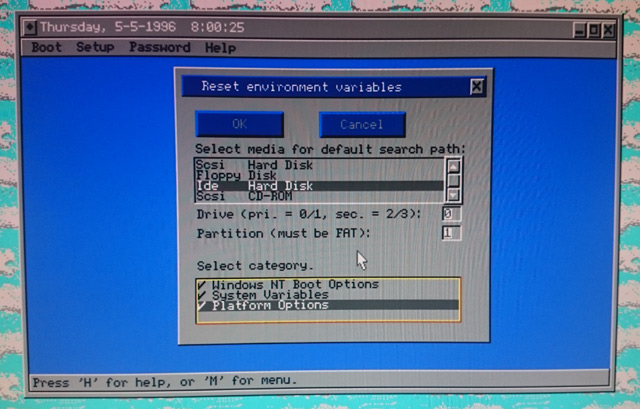
When I started this project, I already knew I’d run into some issues with the RTC chip’s battery being long dead. I found that when power is removed from the system, the firmware decides to forget EVERYTHING about your system. Not only that, you can’t just re-add your bootloader options until you perform a reset ritual as otherwise you’ll just run into random errors and strange failures. Each time I power the system on, I have to perform a reset of all firmware variables as seen in the picture below.
Good enough? Nope. Now you need to perform a system reboot. You MIGHT need to perform yet another environment variable reset if you get further errors during this whole process. Next up is going back into the hard disk setup and telling the firmware to use your 10 megabyte FAT partition as the system partition. You must do this before re-adding your bootloader entry, and it will not let you perform this if you have a bootloader entry already in there. Once that is done, your bootloader configuration needs to reflect the following options as what comes up as default will not work.
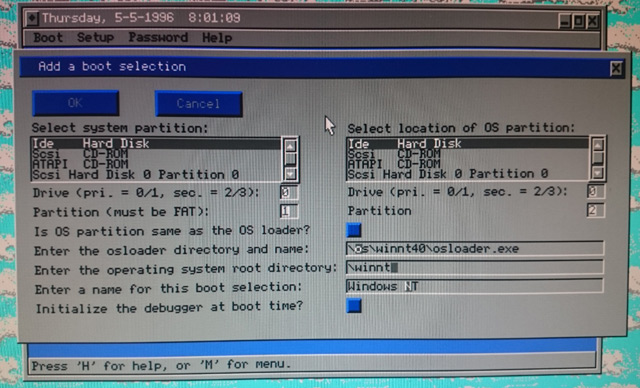
You’ll see that your system partition is 1 (this is the 10 megabyte FAT partition) and your OS partition is 2 (the one created by the NT installer). The default osloader directory path shows up as “winnt” so you have to manually change it to “winnt40” or it’ll fail. Once this is saved, it MIGHT boot… If not, just reboot it again and see what happens.
Conclusion
This project was both fun and frustrating to the point of questioning my own sanity. I’ve owned this Motorola board for at least 15 years but never managed to get a video signal using any of the cards in my collection until I decided to try a spare card from an old Pentium I recently grabbed off eBay. Turns out getting the video to even work was actually the easy part… I expect to keep the NT 4.0 installation on there as I’d need to somehow flash PPCBUG back on there if I wanted to try AIX or Solaris. For anyone else wanting to experience the same “fun” I did, you’ll probably have more luck finding IBM PowerPC hardware as this Motorola stuff seems pretty rare now.
If you want to see more details about the Motorola Atlas board, I’ve posted all the specs and information I could find over at https://wiki.preterhuman.net/Motorola_Atlas. You can also find copies of PReP related files on the Altexxa public FTP at ftp://ftp.atlas.altexxa.net/software/prep/.


Paul, this is a great and thorough article, thanks for the trip down memory lane. I was one of the privileged few to run NT on PPC back in the day. My partner and I created the PhotoMorph application that ran on PPC, Alpha, MIP, and Intel NT platforms and was used both for PowerPC promotion and the great benchmark done at PC Magazine and Byte. I had a PowerPC Thinkpad courtesy of IBM.
That was a really interesting read. Great work!!