Oxidized Tips & Tricks – Config Management
What is Oxidized? Per the project author, Oxidized is a network device configuration backup tool. The Oxidized service connects to your devices via SSH or telnet and queries the running configuration for changes against its last read. I won’t go into the specifics of installing Oxidized as there are a few guides out there with plenty of information, but I will discuss some of the more custom aspects of configuring Oxidized as well as a hack or two.
Basic Info
My Oxidized deployment is set to use the node list source as a CSV and the output as a locally stored Git repo. You must have the output set to Git to support the version control feature within Oxidized. The default node query interval is 3600 seconds (1 hour) which is likely fine leaving as is unless your environment undergoes numerous changes throughout the day. My nodes use centralized authentication so my dedicated service account for Oxidized is just defined in the config file as opposed to specified under each node in my source list.
Oxidized Config
- Using Groups – In my production environment, I require config change tracking across more than 100 devices. Not all of these are the same type of device. To assist with sorting devices in my web interface, I’ve created separate groups for a few of my device types. Depending on how you configure your Git output, this will also create a separate repo for each group. Here’s a sample of my config line:
groups: {Router Switch Firewall LB} - SSH Proxy – Unless your Oxidized host can directly SSH/telnet to every device you plan on tracking, you may need to use an SSH proxy. This essentially acts as a jump host allowing Oxidized to bypass limitations you may have in your environment such as segregated networks or access control lists. In my case, less than half of my nodes required the use of the SSH proxy. To accomplish this I set my source CSV to have the last field as the SSH proxy and nodes not requiring it would just have it blank. Here’s what my config looks like:
source:
 default: csv
 csv:
   file: /path/to/router.db
   delimiter: !ruby/regexp /:/
   map:
     name: 0
     ip: 1
     model: 2
     group: 3
   vars_map:
     ssh_proxy: 4
With the above setup, my CSV node list would contain 5 fields for nodes requiring an SSH proxy. An actual node line from your router.db may look something like router01:172.21.33.2:cisco:Router:192.168.84.100 where the last field is the IP of your SSH proxy. For nodes not requiring the proxy, I simply leave it blank after the 4th field. I’ll also mention your SSH proxy server will of course require keys setup allowing your Oxidized server password-less authentication.
- Model-specific Variables – In my environment, our device user accounts are full privilege levels and are dropped directly into “enable” mode upon login. This is required by Oxidized in order to query full config details. If you’ve ever SSH’d into a Cisco ASA, you may notice it drops you into normal user mode by default requiring you to manually enter “enable” mode with your password. Luckily, you can tell Oxidized to do this! Since this is required for every ASA in my node list, I set the enable variable directly on the model. Here’s what you’d find in your config:
models:
  asa:
    vars:
      enable: yourpassword
You’ll need to note that the vars setup is on the predefined model name and not what you’ve configured under model_map in the config. If you’ve mapped “asa” model to “ciscoasa” as I have, your CSV source will say “ciscoasa” but your models config will still be “asa” as seen above.
- Adjusting Timeout – The default node session timeout is 20 seconds. This seems to be acceptable for most devices, but if your nodes have extremely large running configurations you may run into problems. In my environment, the worst offender is a multi-VDOM FortiGate firewall. After trying different timeout settings and watching the SSH session scroll down my screen as I tail -f the log file, I found I needed to set the timeout to somewhere in the 400-500 second range to give Oxidized enough time to grab the massive FortiGate configuration. A single-VDOM FortiGate might not give you trouble, but if you’re running upwards of 10 VDOMs you’ll need to keep this in mind.
Tweaks
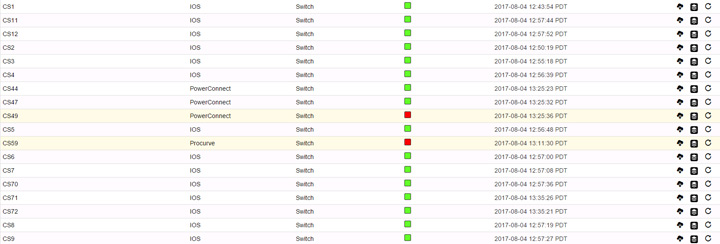
At the time of this article, the Oxidized web interface defaults to a 50 node view. If you change it to “all” it’ll reset back to 50 the next time you refresh the page. As noted previously, I use more than 50 nodes so I wanted mine to list all nodes unless I specify otherwise. A quick hack I performed was editing the /usr/local/share/gems/gems/oxidized-web-0.9.2/lib/oxidized/web/views/nodes.haml file (path may vary depending on how you installed) and making this change to the line starting with lengthMenu:
"lengthMenu": [[-1, 50, 250, 500], ["All", 50, 250, 500]],
This change moved the “All” option to be the default view.
Conclusion
Oxidized seems to handle my config management requirements decently, and the web interface is clean and easy to navigate. If you’re looking to deploy your first config version control system or considering replacing an older system you currently use, I’d suggest trying out Oxidized and seeing how it works for you.